Unit 1: Identity
Identity Popplet
Automatic Drawing
“Automatic drawing . . . was developed by the surrealists [circa 1920s], as a means of expressing the subconscious. In automatic drawing, the hand is allowed to move ‘randomly’ across the paper. In applying chance and accident to mark-making, drawing is to a large extent freed of rational control. Hence the drawing produced may be attributed in part to the subconscious and may reveal something of the psyche, which would otherwise be repressed.”
“Automatic drawing was pioneered by Andre´ Masson. Artists who practiced automatic drawing include Joan Miro´ , Salvador Dali, Jean Arp, and Andre´ Breton.”
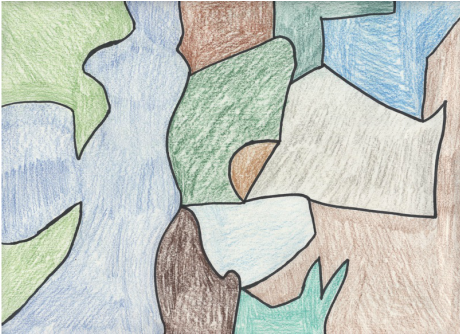
How do I create an automatic drawing?
1.Obtain paper and sharpen pencil.
2.Relax! Let your mind wander or “go blank.”
3.When ready, begin drawing slowly and lightly. You may choose to (1) close your eyes, (2) look away from, or (3) look at your paper.
4.When drawing, work very hard at letting your subconscious take over.
5.Continue drawing until you feel finished, a few minutes perhaps.
6.Stop and “read” the lines. What has presented itself to you? And why?
7.Look at your drawing and emphasize objects that seem to advance toward you by darkening those lines with Sharpie.
8.Erase insignificant lines.
9.Share your work with a peer. Share thoughts.
10.Add value using colored pencil or watercolor pencils (mix colors by crosshatching).
Source: http://en.wikipedia.org/wiki/Surrealist_automatism
“Automatic drawing was pioneered by Andre´ Masson. Artists who practiced automatic drawing include Joan Miro´ , Salvador Dali, Jean Arp, and Andre´ Breton.”
How do I create an automatic drawing?
1.Obtain paper and sharpen pencil.
2.Relax! Let your mind wander or “go blank.”
3.When ready, begin drawing slowly and lightly. You may choose to (1) close your eyes, (2) look away from, or (3) look at your paper.
4.When drawing, work very hard at letting your subconscious take over.
5.Continue drawing until you feel finished, a few minutes perhaps.
6.Stop and “read” the lines. What has presented itself to you? And why?
7.Look at your drawing and emphasize objects that seem to advance toward you by darkening those lines with Sharpie.
8.Erase insignificant lines.
9.Share your work with a peer. Share thoughts.
10.Add value using colored pencil or watercolor pencils (mix colors by crosshatching).
Source: http://en.wikipedia.org/wiki/Surrealist_automatism
Mini-Compositions: Collage
. . . develop a new ARTIST IDENTITY with the art of collage.
Design Problem:
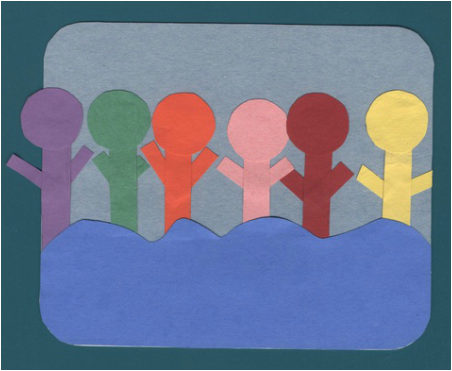
Create a series of 1-3 small cut-paper collages that capture the essence of your identity through the use of simple lines, shapes, colors, and space
This picture is of my deployment in Texas and it represents what helped shape my identity because my friends there helped me find myself. Brian is purple because of his love for the ravens. He is hanging off the paper a little because he is the one in the group that likes to wonder away. Joey is green because he loves nature and is all American. Robbie is orange because he is bright, outgoing, and loud. I am pink because I am girly and pink is girly. Carlos is red because red is the color of love, strength, and fire. He was also wearing a red shirt when he first took me dancing. Bill is yellow because of his love for the Steelers and he is always looking on the bright side of things. The blue wave represents all the fun times that we all had at the pool.
How do I create a Mini-Composition Collage?
1.Brainstorm 3 events (big or small) from your personal history that have helped shape your identity.
2.Make simple sketches of each using shapes.
3.Reconsider your sketches:
–Can they be simplified even more?
–Can they be reduced to a symbol by drawing only a part of it?
4.Begin your first collage when ready: select and draw onto your colored paper. Cut-out when ready.
5.Experiment with arrangements of these shapes on a background piece of paper. Overlap, rotate, and change them until you are satisfied. Then, glue them in place.
6. Repeat this process for Composition #2 and Composition #3.
Reflection:
How did the studio lesson relate to the given Big Idea?
The Mini-Compositions in Collage relates to the big idea of identity because when making the collage we were supposed to think of 3 things from our personal history that helped shape our identity. We were supposed to use simple lines, shapes, colors, and space to show how something has shaped our identity.
How might you employ visual art integration utilizing the studio lesson in your own classroom?
I would employ visual art integration utilizing the Mini-Compositions in Collage in my own classroom by having the student's think of things that they enjoy doing. I would first have the students write down a list of things they enjoy and have them pick the top three that they are most interested in. Then the students would write down all the reasons why they enjoy doing it. I would then have them do a mini-composition in collage using the reasons why they enjoy the item.
Source: (National Gallery of Art, 2013)
Design Problem:
Create a series of 1-3 small cut-paper collages that capture the essence of your identity through the use of simple lines, shapes, colors, and space
This picture is of my deployment in Texas and it represents what helped shape my identity because my friends there helped me find myself. Brian is purple because of his love for the ravens. He is hanging off the paper a little because he is the one in the group that likes to wonder away. Joey is green because he loves nature and is all American. Robbie is orange because he is bright, outgoing, and loud. I am pink because I am girly and pink is girly. Carlos is red because red is the color of love, strength, and fire. He was also wearing a red shirt when he first took me dancing. Bill is yellow because of his love for the Steelers and he is always looking on the bright side of things. The blue wave represents all the fun times that we all had at the pool.
How do I create a Mini-Composition Collage?
1.Brainstorm 3 events (big or small) from your personal history that have helped shape your identity.
2.Make simple sketches of each using shapes.
3.Reconsider your sketches:
–Can they be simplified even more?
–Can they be reduced to a symbol by drawing only a part of it?
4.Begin your first collage when ready: select and draw onto your colored paper. Cut-out when ready.
5.Experiment with arrangements of these shapes on a background piece of paper. Overlap, rotate, and change them until you are satisfied. Then, glue them in place.
6. Repeat this process for Composition #2 and Composition #3.
Reflection:
How did the studio lesson relate to the given Big Idea?
The Mini-Compositions in Collage relates to the big idea of identity because when making the collage we were supposed to think of 3 things from our personal history that helped shape our identity. We were supposed to use simple lines, shapes, colors, and space to show how something has shaped our identity.
How might you employ visual art integration utilizing the studio lesson in your own classroom?
I would employ visual art integration utilizing the Mini-Compositions in Collage in my own classroom by having the student's think of things that they enjoy doing. I would first have the students write down a list of things they enjoy and have them pick the top three that they are most interested in. Then the students would write down all the reasons why they enjoy doing it. I would then have them do a mini-composition in collage using the reasons why they enjoy the item.
Source: (National Gallery of Art, 2013)
Chuck Close Meets Walt Disney: Marks, Multiples, and Materials
“I think problem-solving is highly overrated. Problem CREATION is much more interesting. If you want to react personally, you have to move away from other people’s ideas. You have to back yourself into your own corner where no one else’s solutions apply and ask yourself to behave as an individual.”
Design Problem:
Using “marks, multiples, and materials,” create a painting and/or drawing representing your multifaceted identity.
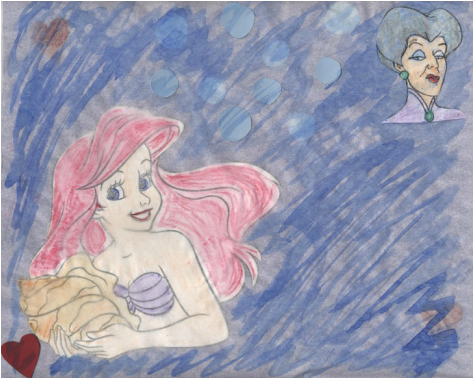
I am like Ariel because I am adventurous, spirited, fair skin, red hair, bright, stubborn, curious, and romantic. I am adventurous because I love to travel and curious because I love to learn. I am like Lady Tremaine because I am sophisticated, a control-freak, and little jealous. I am a control-freak because I love to plan and organize things.
How do I create Chuck Close Meets Walt Disney?
1.Consider two Disney characters that, for some reason, appeal to you: one protagonist and one antagonist
2.Write the two names down.
3.List traits of each character. Conduct research on the web, if necessary (try Disney.wikia.com)
4.Rate yourself on a scale of 1 to 5 for each trait based upon similar traits (be honest)
5.Provide evidence of similarities
6.Consider which character(s) you would like to honor, and continue the discovery process through art making
•Using “marks, multiples, and materials,” create a painting and/or drawing representing your multifaceted identity.
•Consider utilizing layering and juxtaposition to assist you in honoring the unique identifying marks that distinguish you from all others.
•Please experiment with several of the following materials: Disney character pages, photos, tracing paper, construction paper, scissors, adhesive, crayon, and/or watercolors.
Reflection:
How did the studio lesson relate to the given Big Idea?
The Chuck Close meets Walt Disney lesson related to the big idea of identity because character traits help what defines your identity. Character traits help make up who you are as a person which shapes your identity. It also shows that just because a character is an antagonist doesn't mean that they don't have some really great character traits. It shows us that it is how you use your character traits and identity that defines you as a person.
How might you employ visual art integration utilizing the studio lesson in your own classroom?
I would employ visual art integration utilizing Chuck Close meets Walt Disney lesson in my own classroom by giving my student a list of Disney protagonist characters and antagonist characters. I would explain to the students what protagonist and antagonist means and the difference between them. On the list I would include some of the character traits that the character has and have the students try to identify with the characters. I would have them write out why they believe they have that specific trait. Then I would give the students pictures of the characters or let them find their own and have the students make a picture showing how they relate to the characters.
Source: (Greenberg & Jordan citing Close, 1998)
Design Problem:
Using “marks, multiples, and materials,” create a painting and/or drawing representing your multifaceted identity.
I am like Ariel because I am adventurous, spirited, fair skin, red hair, bright, stubborn, curious, and romantic. I am adventurous because I love to travel and curious because I love to learn. I am like Lady Tremaine because I am sophisticated, a control-freak, and little jealous. I am a control-freak because I love to plan and organize things.
How do I create Chuck Close Meets Walt Disney?
1.Consider two Disney characters that, for some reason, appeal to you: one protagonist and one antagonist
2.Write the two names down.
3.List traits of each character. Conduct research on the web, if necessary (try Disney.wikia.com)
4.Rate yourself on a scale of 1 to 5 for each trait based upon similar traits (be honest)
5.Provide evidence of similarities
6.Consider which character(s) you would like to honor, and continue the discovery process through art making
•Using “marks, multiples, and materials,” create a painting and/or drawing representing your multifaceted identity.
•Consider utilizing layering and juxtaposition to assist you in honoring the unique identifying marks that distinguish you from all others.
•Please experiment with several of the following materials: Disney character pages, photos, tracing paper, construction paper, scissors, adhesive, crayon, and/or watercolors.
Reflection:
How did the studio lesson relate to the given Big Idea?
The Chuck Close meets Walt Disney lesson related to the big idea of identity because character traits help what defines your identity. Character traits help make up who you are as a person which shapes your identity. It also shows that just because a character is an antagonist doesn't mean that they don't have some really great character traits. It shows us that it is how you use your character traits and identity that defines you as a person.
How might you employ visual art integration utilizing the studio lesson in your own classroom?
I would employ visual art integration utilizing Chuck Close meets Walt Disney lesson in my own classroom by giving my student a list of Disney protagonist characters and antagonist characters. I would explain to the students what protagonist and antagonist means and the difference between them. On the list I would include some of the character traits that the character has and have the students try to identify with the characters. I would have them write out why they believe they have that specific trait. Then I would give the students pictures of the characters or let them find their own and have the students make a picture showing how they relate to the characters.
Source: (Greenberg & Jordan citing Close, 1998)
Artful Personifications: Mixed Media
Anthropomorphism - “attribution of human characteristics to other animals, non-living things, phenomena, material states, objects or abstract concepts”
Design Problem:
Use PERSONIFICATION to communicate the IDENTITY of a familiar character from fairytale, fable, or other narrative.
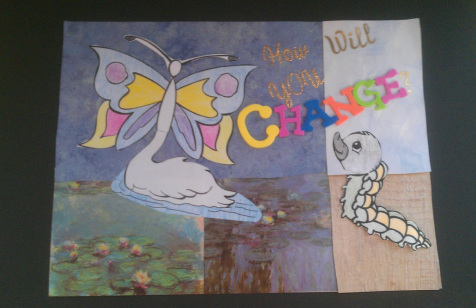
In my picture I chose to do the fairytale of The Ugly Duckling. I chose to compare it to a caterpillar turning into a butterfly. I chose the text "How will you change?" because it provokes the thought that everyone changes and it can be for worse or better. The animals don't have any control over how they change but we as humans do.
How do I create a Mixed Media Artful Personifications?
1. Select a narrative and character as the subject.
2. Select an animal whose commonly recognized characteristics complement the IDENTITY of the selected character.
3. Combine animal and human imagery using 3 or more mediums (art materials) to render the personification.
4. Consider costume, expression, gesture, props, setting, etc. as IDENTITY clues for the viewer.
Reflection:
How did the studio lesson relate to the given Big Idea?
The Mixed Media Artful Personification related to the big idea of identity because we had to find an animal whose characteristics completed the identity of our selected character. It goes to show that you can identify with animals and have similar characteristics with them. This lesson shows that there are things that you can identify yourself with besides other people.
How might you employ visual art integration utilizing the studio lesson in your own classroom?
I would employ visual art integration utilizing the Mixed Media Artful Personification lesson in my own classroom by reading to my student's different fairytales, fables, and other narratives. This lesson is a great way to integrate literacy and art. To integrate art with history, instead of having the students use a character from a fairytale they could use someone from History and find an animal that characteristics complete their identity. I could have the students decide what animal they believed had the characteristics to complement their identity and then have them write a story about it. A lot of the students in my field class are really interested in dinosaurs so I could have them research what dinosaur they think that they identify with and write about why they think that.
Source: Wikipedia (2013). Anthropomorphism. Retrieved from http://en.wikipedia.org/wiki/Anthropomorphism
Design Problem:
Use PERSONIFICATION to communicate the IDENTITY of a familiar character from fairytale, fable, or other narrative.
In my picture I chose to do the fairytale of The Ugly Duckling. I chose to compare it to a caterpillar turning into a butterfly. I chose the text "How will you change?" because it provokes the thought that everyone changes and it can be for worse or better. The animals don't have any control over how they change but we as humans do.
How do I create a Mixed Media Artful Personifications?
1. Select a narrative and character as the subject.
2. Select an animal whose commonly recognized characteristics complement the IDENTITY of the selected character.
3. Combine animal and human imagery using 3 or more mediums (art materials) to render the personification.
4. Consider costume, expression, gesture, props, setting, etc. as IDENTITY clues for the viewer.
Reflection:
How did the studio lesson relate to the given Big Idea?
The Mixed Media Artful Personification related to the big idea of identity because we had to find an animal whose characteristics completed the identity of our selected character. It goes to show that you can identify with animals and have similar characteristics with them. This lesson shows that there are things that you can identify yourself with besides other people.
How might you employ visual art integration utilizing the studio lesson in your own classroom?
I would employ visual art integration utilizing the Mixed Media Artful Personification lesson in my own classroom by reading to my student's different fairytales, fables, and other narratives. This lesson is a great way to integrate literacy and art. To integrate art with history, instead of having the students use a character from a fairytale they could use someone from History and find an animal that characteristics complete their identity. I could have the students decide what animal they believed had the characteristics to complement their identity and then have them write a story about it. A lot of the students in my field class are really interested in dinosaurs so I could have them research what dinosaur they think that they identify with and write about why they think that.
Source: Wikipedia (2013). Anthropomorphism. Retrieved from http://en.wikipedia.org/wiki/Anthropomorphism
