Unit 4: Celebrations
Celebrations Popplet
Finger Puppets: Modeling Compound
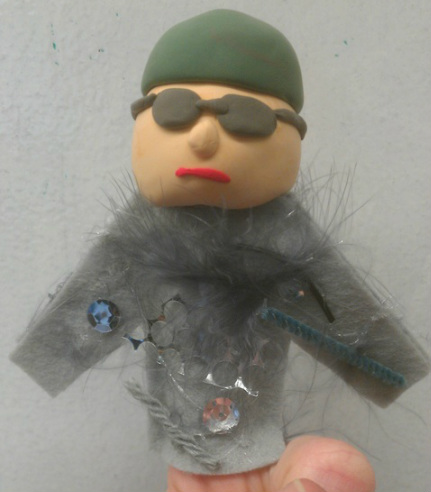
Design Problem: Create a clay finger puppet to celebrate something about yourself. Consider
creating a garment for the finger puppet that makes some sort of celebratory sound when moved.
I chose to make a soldier because the Army makes up a big part of my identity. The Army isn't always the best thing to be in but there are moments that are worth celebrating. If it wasn't for the Army I wouldn't have met some amazing people. The Army has taught me to be strong because even though it puts new people in your life, it takes them away just as quick. I chose to make my camo a little flash and fun because even though I have to wear a uniform and we all look alike we are all different people inside.
How to create a Modeling Compound Finger Puppet:
1. Students begin with an approximately 1-1/4" ball of Cloud Clay or Model Magic as their base for each finger puppet. Students should consider how many characters are necessary to make their stories come alive.
2. To make a puppet, students push their finger into the clay and form the clay around it. The puppets should be sit snuggly on the finger. If the puppet is too loose, it will fall off.
3. Create details with additional clay using a variety of colors. Colors can be mixed to create additional colors. Make sure the students think about their stories to determine any accessories the characters may need. The clay should stick to itself. After 30 minutes the clay may begin to dry and the pieces may no longer stick together firmly. Use glue to reattach the pieces as necessary. Use an extruding tool to help create fine details.
4. Let the puppets dry completely. The finished pieces will be lightweight, with the consistency of a firm foam ball.
5. Paint a thin coat of Blickrylic Gloss Medium over the dry finger puppets to protect them from dirt. The coating will also help the puppet pieces stick together.
Reflection:
How did the studio lesson relate to the given Big Idea?
The Modeling Compound Finger Puppets relates to the big idea of celebrations because you are making a model of an identity that you want to celebrate. When creating a finger puppet of an identity that you identify yourself with you get to create it however you see yourself and not how others might see you. It lets you celebrate what you enjoy about that identity.
How might you employ visual art integration utilizing the studio lesson in your own classroom?
I would employ visual art integration utilizing Modeling Compound Finger Puppets in my own classroom by having the students make their own finger puppet about a person we were studying in social studies. I could have my students write a story about their finger puppet or someone else's finger puppet. Finger puppets can be a way for students to feel comfortable expressing themselves because the "puppet" can say things that the student might not be comfortable saying.
Celebrating 21st Century America: Graphic Design
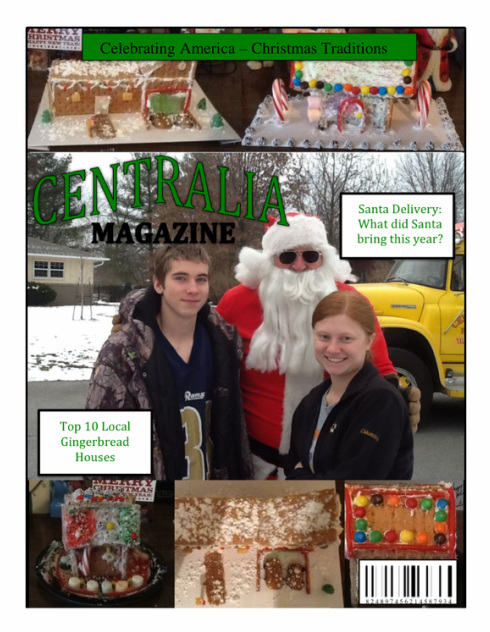
“I was showing the America I knew and observed to others who might not have noticed.” -Norman Rockwell
Design Problem: Create a photography-based
magazine cover design that celebrates 21st
century American using one of these Rockwell themes
–Celebrating American through the common, often overlooked
–Celebrating American change and invention
–Celebrating American tradition and the past
•To avoid potential copyright issues, you are asked to use your own, original photograph. (This may be a photograph you have previously taken.)
I chose to use the pictures of my brother and I getting fruit and candy from Santa because it is a Christmas Tradition that Santa brings a treat to each family in our town on Christmas. I put the pictures of our gingerbread houses because every year we make them.
How to create a Graphic Design Celebrating 21st Century America:
Step #1: Copy & paste the desired photograph into an MS Word document.
Step #2: Click on the imported image to reveal its sizing handles. Place your mouse cursor on one of these handles (lower right corner of image is best) and press down on the left mouse button. Holding this button down, you can resize the image.
To superimpose text or image over the main image:
1.Go to INSERT
2.Select TEXT BOX. From the drop down menu, select DRAW TEXT BOX. Place the cursor (probably a plus shape) somewhere on your photo, press down on the left button of your cursor, and drag the text box to the size you wish.
- For text, you can type directly into this box. Highlight and resize text, then, to the desired size. You may wish to change the text color and/or bold it as well.
- For an image, you will need to drag the textbox to the approximate size you want; then, copy and paste the image into this text box.
3. NOTICE (below) that the text box has a solid background. If you want the text box to disappear leaving only the text, click on the text box to reveal its handles. Then, go to DRAWING TOOLS along the top menu bar and click SHAPE FILL. Select NO FILL. If you wish to delete the textbox outline, click on SHAPE OUTLINE and select NO OUTLINE as well. Follow the same procedure to erase the textbox fill and outline for a textbox containing a photograph as well.
To outline text for contrast:
1. Click on the text box containing the text
2. Click on DRAWING TOOLS
- Select TEXT FILL to change the text color
- Select TEXT OUTLINE to outline the text w/ your choice of color
Photograph Special Effects:
On MS Word, you will have a limited number of special effects to choose from which may add interest
to your magazine cover design if you so desire.
1. Click on the picture to make the PICTURE TOOLS tab appear on the menu across the top of the screen. Click on the PICTURE TOOLS tab to reveal your menu choices.
- Click on the COLOR option on the left end of the menu to change COLOR SATURATION, COLOR TONE, or to select RECOLOR.
- Click on ARTIST EFFECTS to do some interesting things with the texture of the photo.
Reflection:
How did the studio lesson relate to the given Big Idea?
The Graphic Design Celebrating 21st Century America relates to the big idea of celebrations because through a magazine cover you can celebrate either American traditions, the common and overlooked, or change and invention. Magazine covers give you a brief look into what is in the inside of the magazine so therefor on the cover you are celebrating the big main ideas within the magazine. Our options of American traditions, the common and overlooked, or change and invention relate to celebrations because those three items are major things that happen in your life and are worth celebrating.
How might you employ visual art integration utilizing the studio lesson in your own classroom?
I would employ visual art integration utilizing Graphic Design Celebrating 21st Century America in my own classroom by having the students make book covers for their writing pieces. I could also have them make a magazine cover for the topics we are learning in social studies and the little texts will be facts about the topic. I could use this idea for math and have the students find all the different shapes that are on a magazine cover. Instead of using Graphic Design the students could make magazine covers out of paper, and make them relief or 3D.
Artist's Choice: Class Quilt
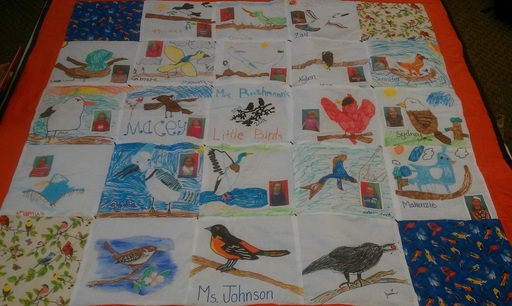
Design Problem: Use Miriam Schapiro as an inspiration to create your own art.
I chose to make a Class Quilt for my field teacher because she is such a deserving person and has been so helpful to me this semester. I fell in love with each student in my class so it was great getting to work with them to create their quilt square. I chose birds because my teacher has a huge love of birds and she has taught her class all about them.
How to create a Class Quilt:
1. Cut 13" by 13" white squares.
2. Give the students fabric markers (bought at Wal-Mart) and let them create whatever they life. Make sure to tell them to keep 2 fingers around the border clear of art so that it can be sewn together. If you are going to use pictures make sure that you leave a white space for it because the Iron on Transfer Paper will go through the fabric markers and it will cover up your photo.
3. Take pictures of the students standing behind a back ground. Print mirror images on Iron on Transfer Paper with an Ink Jet Printer so that the words on their shirt are not backwards when you iron the photo on.
4. Sew all the squares together and add border if desired.
5. Sew the finished front to a sheet back. All trim around the edge.
Reflection:
How did the studio lesson relate to the given Big Idea?
The Class Quilt relates to the big idea of celebrations because the students created a bird that they could identify with and then I sewed it all together and gave it to her we were celebrating all that their teacher had did for them and me. The students were so excited because they know how special their teacher is and how much hard work she puts into her teaching. It was nice that she got to keep something to celebrate all she has taught the students. The students didn't know anything about birds until they came to her class and now they can go on walks outside and name the different birds based on seeing and hearing them. Lee Elementary School is also an expressive arts school and the blank represents celebrating all the students have learned.
How might you employ visual art integration utilizing the studio lesson in your own classroom?
I would employ visual art integration utilizing Class Quilt in my own classroom by having the students make quilts for important events. Lee Elementary School has auction nights where they auction off the art pieces the students have made. I think a quilt about the school or community would great. I could also have the students make paper quilts to express something we have learned. For example, my field teacher had the students make a quilt square about Martin Luther King Jr. and then displayed it in the hall for the school to see. I could also have the students make a quilt square to express what they have learned. I could also teach the students how to sew by hand and then they could sew their quilt square to another’s and that way the whole class is working together to complete the quilt.
